Scheduling Backups To OneDrive For Paperless-ng Using RClone
October 3, 2021 paperless-ng raspberry-pi backups ☕️ buy me a coffee
I’ve recently done some work in setting up myself a Paperless-NG instance on a a Raspberry Pi at home. Since I don’t have a lot of resources (i.e. money) to throw at it, all my data resides on a single portable hard drive; not ideal. However, being a PhD student, my university gives me 1TB of OneDrive cloud storage which I’m putting to good use for cheap, off-site data storage. Whilst this guide is for OneDrive, rclone does support 43 different remotes so you can adapt this guide to your needs.
In this guide we will set up 2 “remotes” with RClone and then use rclone_jobber to easily back up our data.
Note: Paperless-NG is now being maintained in a new fork. See this post for more information on upgrading.
Table of Contents
Edit 04/10/2021: Some good comments were made on that other services exist that solve this issue out-of-the-box. I like
rclonewithrclone_jobberas it seamlessly does snapshots. It’s low cost and easy to set up. Please do consider other methods before mindlessly committing to mine.
RClone
First of all, install RClone with whatever package manager you’re using. For raspberry pi, sudo apt-get install rclone will suffice.
Next we’ll have a quick look at how the aforementioned remotes work.
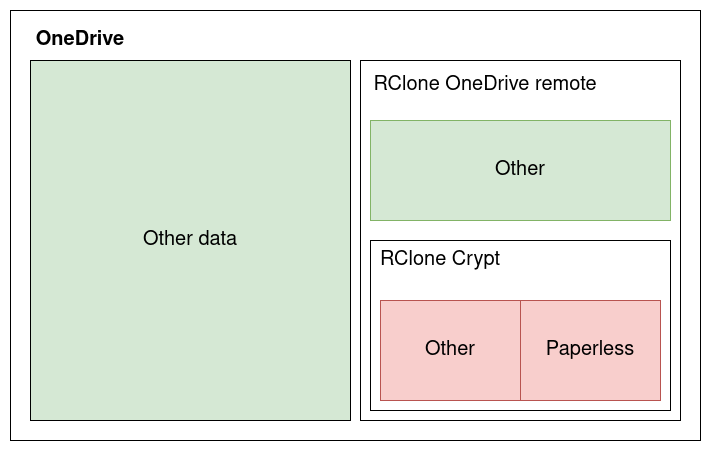
What we’re going to do is create the first “remote” within OneDrive (in green on the right) that is unencrypted. This means we can sync data to this folder via the rclone cli but it’s unencrypted. I use paperless for some sensitive documents so this isn’t great. Therefore we use a “crypt” remote within the OneDrive remote (as seen in red). Remotes within remotes.
Linking your account to RClone
Connecting to OneDrive via rclone is stupid easy. First run rclone config on the raspberry pi:
$ rclone config
Current remotes:

Name                 Type
====                 ====

e) Edit existing remote
n) New remote
d) Delete remote
r) Rename remote
c) Copy remote
s) Set configuration password
q) Quit config
e/n/d/r/c/s/q>
As you can see, this opens a empty menu for us with a couple commands. Hit n for new and type in a descriptive name such as onedrive_uni. After this you will see roughly 43+ different remote types for you to chose. At the time of writing, the OneDrive remote was number 26.
Type of storage to configure.
Enter a string value. Press Enter for the default ("").
Choose a number from below, or type in your own value
 1 / 1Fichier
   \ "fichier"
 2 / Alias for an existing remote
   \ "alias"
    ...
25 / Microsoft Azure Blob Storage
   \ "azureblob"
26 / Microsoft OneDrive <-- THIS ONE
   \ "onedrive"
27 / OpenDrive
   \ "opendrive"
    ...
42 / premiumize.me
   \ "premiumizeme"
43 / seafile
   \ "seafile"
Storage> 26
The next 2 options are client_id and client_secret which we can leave blank. The next options is region which will probably be “Microsoft Cloud Global” (i.e. option 1) for you.
OAuth Client Id
Leave blank normally.
Enter a string value. Press Enter for the default ("").
client_id>
OAuth Client Secret
Leave blank normally.
Enter a string value. Press Enter for the default ("").
client_secret>
Choose national cloud region for OneDrive.
Enter a string value. Press Enter for the default ("global").
Choose a number from below, or type in your own value
 1 / Microsoft Cloud Global <-- THIS ONE
   \ "global"
 2 / Microsoft Cloud for US Government
   \ "us"
 3 / Microsoft Cloud Germany
   \ "de"
 4 / Azure and Office 365 operated by 21Vianet in China
   \ "cn"
region> 1
The next options allows you to edit the advanced configuration (which I have never needed to), so leave that blank and hit enter.
This next step is different if you’re doing this on a headless machine (such as via SSH) or one with a monitor. I will go over how to do the headless setup, but this is very similar to the non-headless one. Hit n and press enter.
For this to work, you will need rclone available on a machine that has
a web browser available.

For more help and alternate methods see: https://rclone.org/remote_setup/

Execute the following on the machine with the web browser (same rclone
version recommended):

        rclone authorize "onedrive"

Then paste the result.

Enter a string value. Press Enter for the default ("").
config_token>
As you can see, the next step requires rclone on a non-headless machine. If you’re doing the setup via SSH, this will most likely be the machine you’re physically at.
- Execute `rclone authorize “onedrive”
- Log into Microsoft with your Office365 account as you normally would
- Copy the access token
- Paste the access token into the headless rclone instance
Next up is the type of configuration which is “OneDrive Personal or Business” and will (most likely) be yours too.
Type of connection
Enter a string value. Press Enter for the default ("onedrive").
Choose a number from below, or type in an existing value
 1 / OneDrive Personal or Business  <-- THIS ONE
   \ "onedrive"
 2 / Root Sharepoint site
   \ "sharepoint"
 3 / Sharepoint site name or URL (e.g. mysite or https://contoso.sharepoint.com/sites/mysite)
   \ "url"
 4 / Search for a Sharepoint site
   \ "search"
 5 / Type in driveID (advanced)
   \ "driveid"
 6 / Type in SiteID (advanced)
   \ "siteid"
 7 / Sharepoint server-relative path (advanced, e.g. /teams/hr)
   \ "path"
config_type> 1
The next two options are left on their defaults.
Creating a Crypt remote within the OneDrive remote
After the previous steps, we will be at the home page of rclone config. Once again hit n for new and enter a descriptive name for the remote - I went for onedrive_uni_enc.
As before, select the correct remote type which this time is “Encrypt/Decrypt a remote” and at the time of writing, was number 11.
The next step will ask for the location of your remote. For this guide we are focusing on OneDrive but you could chose any remote. To keep my OneDrive organised, I chose onedrive_uni:backups/.
Remote to encrypt/decrypt.
Normally should contain a ':' and a path, e.g. "myremote:path/to/dir",
"myremote:bucket" or maybe "myremote:" (not recommended).
Enter a string value. Press Enter for the default ("").
remote> onedrive_uni:backups/
The next two steps focusing on the levels of encryption. I usually go for “standard” for filename encryption, and “true” for directory encryption.
Be very careful in these next steps as once you’ve entered your password and salt, you cannot retrieve it again without repeating the whole process. Furthermore, if you do not backup your keys and lose the config through hard drive failure or whatnot, then all your backed up data is GONE. For this, I use bitwarden’s secure notes.
My configuration for the password and salt can be seen below. I chose 128 bit keys but you can go for whatever you like.
Password or pass phrase for encryption.
y) Yes type in my own password
g) Generate random password
y/g> g
Password strength in bits.
64 is just about memorable
128 is secure
1024 is the maximum
Bits> 128
Your password is: ob2FY5mNFQ37KksdCqP3VQ
Use this password? Please note that an obscured version of this
password (and not the password itself) will be stored under your
configuration file, so keep this generated password in a safe place.
y) Yes (default)
n) No
y/n> y
Password or pass phrase for salt. Optional but recommended.
Should be different to the previous password.
y) Yes type in my own password
g) Generate random password
n) No leave this optional password blank (default)
y/g/n> g
Password strength in bits.
64 is just about memorable
128 is secure
1024 is the maximum
Bits> 128
Your password is: NrBo2D52xdgGfOnA-BjHVw
Use this password? Please note that an obscured version of this
password (and not the password itself) will be stored under your
configuration file, so keep this generated password in a safe place.
y) Yes (default)
n) No
y/n> y
Once again, leave the final two options as default.
rclone_jobber
Strictly speaking, rclone_jobber is not required. A bash one-liner using rclone sync would be enough. However, cloning the repo and using the script means consistent results across any device, plus I like how it does the backups for me.
Execute the following 3 lines
# Clone the repo
$ git clone https://github.com/wolfv6/rclone_jobber /opt/rclone_jobber

# Move into the folder
$ cd /opt/rclone_jobber

# Copy the example script into the top level directory
$ cp examples/job_backup_to_remote.sh ./

# Create the filter_rules file
$ touch filter_rules
The original script uses environmental variables, but I prefer hard-coding these values. Skip these steps if you would rather not.
- Change
rclone_jobber=$rclone_jobbertorclone_jobber=/opt/rclone_jobber - Change
source="$HOME/test_rclone_data"to wherever your paperless data is kept such assource=/media/PORTABLE_UN/paperless - Change
dest="${remote}:"todest=onedrive_enc:paperless - Change
options="--filter-from=$rclone_jobber/examples/filter_rules"tooptions="--filter-from=$rclone_jobber/filter_rules" - Optional: Create a monitoring URL on something like healthchecks.io and set
monitoring_URLequal to this URL
My final job_backup_to_remote.sh looks like this:
#!/usr/bin/env sh

################################### license ##################################
# job_backup_to_remote.sh calls rclone_jobber to perform a backup to remote.
# Written in 2018 by Wolfram Volpi, contact at https://github.com/wolfv6/rclone_jobber/issues.
# To the extent possible under law, the author(s) have dedicated all copyright and related and neighboring rights to this software to the public domain worldwide.
# This software is distributed without any warranty.
# You should have received a copy of the CC0 Public Domain Dedication along with this software. If not, see http://creativecommons.org/publicdomain/zero/1.0/.
# rclone_jobber is not affiliated with rclone.
##############################################################################

#this script uses these user-defined environment variables: rclone_jobber, remote
rclone_jobber=/media/PORTABLE_UN/rclone_jobber #path to rclone_jobber directory

source="/media/PORTABLE_UN/paperless/"
dest="onedrive_enc:"
move_old_files_to="dated_directory"
options="--filter-from=$rclone_jobber/filter_rules -L -v" <-- Optional -L (follow symlinks) and -v (increase log level) flags
monitoring_URL="REDACTED"

$rclone_jobber/rclone_jobber.sh "$source" "$dest" "$move_old_files_to" "$options" "$(basename $0)" "$monitoring_URL"
We then need to create the filter_rules file. My current setup just excludes the consume and export directories and looks like:
$ cat filter_rules
- consume/**
- export/**
Cron
To automate this process we need to use a scheduler, such as cron. cron is great as it is pre-installed on every linux OS as far as I am aware.
Begin editing the crontab with cron -e. Add the following to the end of it:
0 2 * * * /opt/rclone_jobber/job_backup_to_remote.shThis reads as “run /opt/rclone_jobber/job_backup_to_remote.sh at 2:00 am every day”. You may edit this to suit your needs. Note, however, that rclone is smart enough to only update the backup with new data.
Conclusion
Using FOSS tools like rclone, rclone_jobber, and cron enables us to use any off-site data storage we desire. From google drive to onedrive, ssh to ftp. Paperless-ng is super powerful but what is all that worth if you lose your data. ALWAYS BACK-UP YOUR FILES.